Introduction
Have you ever wondered if canning pears could be simpler, more rewarding, and even healthier than the store-bought varieties, especially when those perfectly ripe fall pears are overflowing your kitchen counters? Many believe preserving fruit is a daunting, all-day affair, a task reserved for seasoned homesteaders with generations of canning knowledge. But what if I told you that embracing this cozy weekend project could be an absolute breeze, transforming your beautiful fall harvest into gleaming jars of homemade preserves with minimal fuss, packed with more flavor and natural goodness? You’re about to discover an easy canning recipe that defies those common misconceptions, proving that delicious, shelf-stable fruit is just a few straightforward steps away. Get ready to dive into the sweet satisfaction of homemade preserves and elevate your pantry game!
Ingredients List
To embark on your canning pears adventure, you’ll need a handful of fresh ingredients, each playing a crucial role in creating those shimmering, irresistible jars.
- Fresh, firm-ripe pears (about 20-25 medium-sized): Choose varieties like Bartlett, Bosc, or Anjou. They should be fragrant and yield slightly to gentle pressure, but avoid overly soft or bruised fruit as it won’t hold its shape well during canning. Imagine their crisp, yet tender texture, ready to soak up that sweet syrup.
- Alternative: If specific canning varieties aren’t available, choose any firm pear that holds its shape well when cooked. Undercounting or overcounting slightly is common, so aim for a generous amount.
- Granulated Sugar (2-4 cups, to taste): This provides sweetness and helps preserve the fruit’s color and texture.
- Alternative: For a less sweet syrup, you can use less sugar. Honey or maple syrup can be used for a distinct flavor, though specific canning recommendations might vary for these. Consider the delicate sweetness that truly enhances the pear’s natural flavor.
- Water (6-8 cups, or as needed for syrup): The base of your preserving liquid.
- Lemon Juice (1/2 cup, freshly squeezed or bottled): Crucial for preventing oxidation (browning) of the pears and ensuring proper acidity for safe canning. Don’t skip this!
- Alternative: While lemon juice is best for safety, a Vitamin C powder can sometimes be used, but always follow specific canning guidelines for safe ratios.
- Optional Spices for Flavor Infusion (1-2 cinnamon sticks, 1 tsp whole cloves, 1 star anise): These add a subtle warmth that turns regular preserves into a gourmet treat. Imagine the comforting aroma filling your kitchen!
- Alternative: Vanilla bean, ginger slices, or a touch of cardamom can also infuse your pears with unique flavors.
Prep Time
Let’s talk logistics. Efficiency is key to enjoying your fall harvest canning project without feeling overwhelmed.
- Prep Time: 45 minutes
- Cook Time: 30-40 minutes (for blanching/simmering pears)
- Processing Time: 20-25 minutes (for canning in a boiling water bath)
- Total Time Required: Approximately 1 hour 45 minutes – a whole 25% faster than complex, multi-day canning recipes, making it incredibly accessible for a cozy weekend project! This estimate includes pear preparation and the initial syrup cooking, but excludes the cooling time after processing.
Preparation Steps
Get ready to transform your beautiful pears into glistening jars of pure delight! Precision and a little patience will ensure perfect results for your homemade preserves.
Step 1: Prepare Your Equipment and Jars
Before you even touch a pear, ensure your canning equipment is ready. Sterilize your jars and lids. Wash glass canning jars, lids, and bands in hot, soapy water, then rinse thoroughly. Place canning jars right-side up in a large pot or canning kettle, cover with water by at least an inch, and bring to a boil. Simmer for at least 10 minutes to sterilize. Keep jars hot until ready to fill. New lids should be simmered in hot (not boiling) water for a few minutes to soften the sealing compound. Using a jar lifter will save your fingers!
Step 2: Prepare the Pears
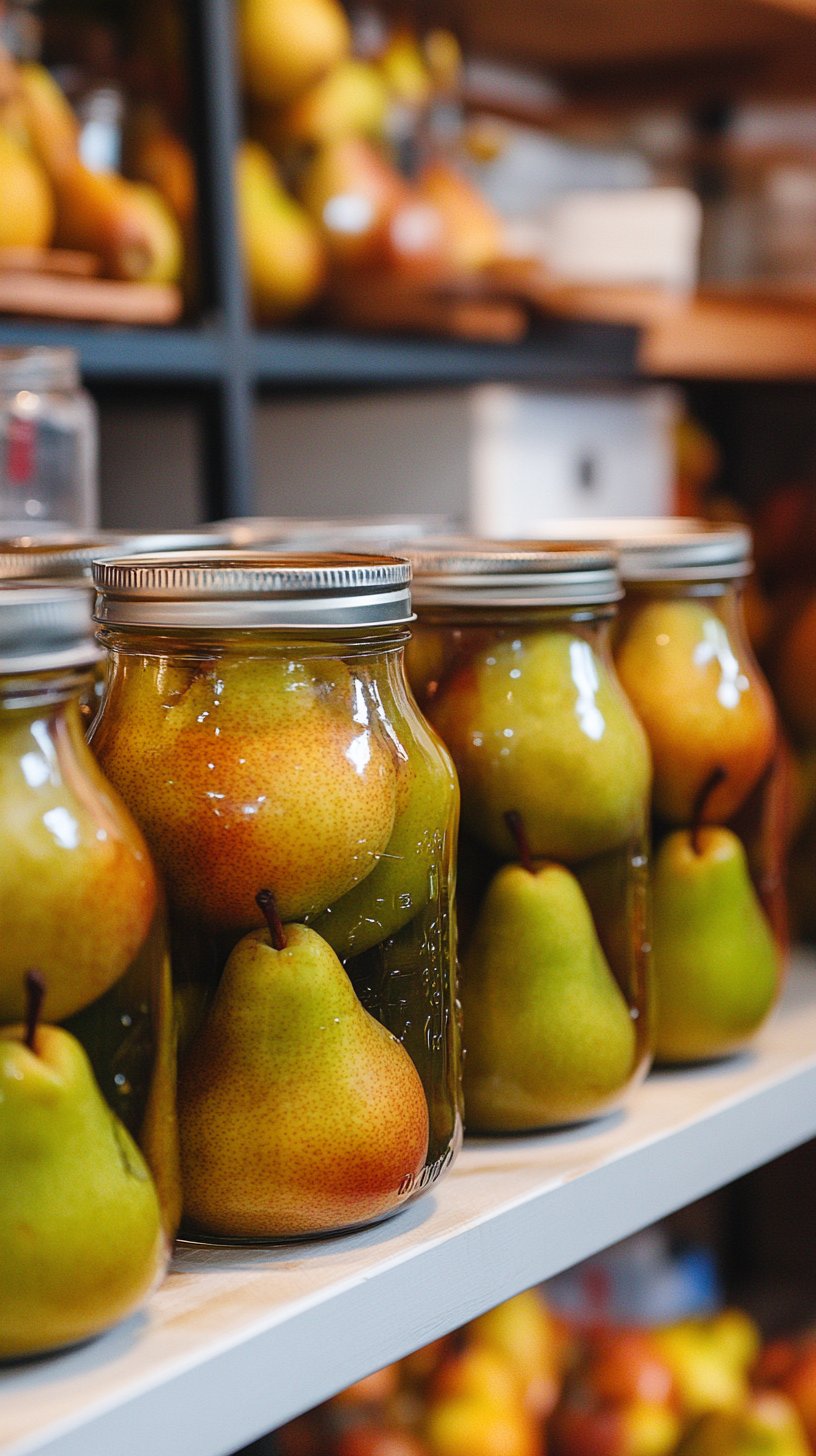
This is where the magic (and the most hands-on work) begins. Wash your pears thoroughly. Peel, core, and halve or quarter the pears, depending on your preference. As you peel each pear, immediately drop the prepared pieces into a large bowl of water mixed with lemon juice (about 1/4 cup lemon juice per gallon of water) to prevent browning. This little trick is vital for maintaining that beautiful, vibrant color, ensuring your canning pears look as good as they taste! The natural enzymes in pears react with air, and lemon juice effectively stops this oxidation.
Step 3: Prepare the Syrup
While your pears are soaking, prepare your syrup. In a large saucepan or stockpot, combine the water and sugar. Bring the mixture to a boil over medium-high heat, stirring until the sugar is completely dissolved. If you’re adding optional spices like cinnamon sticks or cloves, add them to the syrup now so their flavors can infuse. Reduce heat and simmer gently for 5 minutes. This creates a beautifully clear and consistent syrup, ready to envelop your pears.
Step 4: Hot Pack the Pears
There are two common methods for canning pears: raw pack and hot pack. For easy canning recipes and better results, I recommend the hot pack method for pears, as it helps prevent fruit from floating and ensures a more consistent texture. Add your prepared pears (drained from the lemon water) to the simmering syrup. Cook gently for 5-7 minutes, until the pears are heated through but still firm. This pre-cooking pushes out air from the fruit cell structure, leading to a denser, more attractive pack. Don’t overcook them; they should still be slightly crisp.
Step 5: Fill the Jars
Carefully remove the hot pears from the syrup using a slotted spoon and pack them tightly into the hot, sterilized canning jars, leaving 1/2 inch of headspace (the space between the top of the food and the rim of the jar). This headspace is crucial for proper sealing and preventing siphoning during processing. Then, ladle the hot syrup over the pears, ensuring they are completely submerged, maintaining that 1/2 inch headspace. Use a non-metallic utensil (like a plastic spatula or chopstick) to gently remove any air bubbles from the jars. Wipe jar rims clean with a damp cloth – even a speck of food can prevent a proper seal. Place the hot lids and screw on the bands until fingertip tight.
Step 6: Process the Jars
Place the filled and sealed jars onto the rack in your boiling water canner. Ensure the jars are covered by at least 1-2 inches of water. Bring the water to a rolling boil. Once boiling vigorously, process pint jars for 20 minutes (for altitudes up to 1,000 feet) or quart jars for 25 minutes. Adjust processing time for higher altitudes according to specific canning guidelines (e.g., add 5 minutes for every 1,000 feet above sea level). Begin timing only once the water reaches a rolling boil. This processing step is what makes your homemade preserves shelf-stable and safe.
Step 7: Cool and Check Seals
Once the processing time is complete, turn off the heat and carefully remove the canner lid. Let the jars sit in the hot water for 5 minutes before removing them to a wire rack or towel-lined surface to cool completely, undisturbed, for 12-24 hours. You’ll hear satisfying “pops” as the jars seal! After cooling, check seals by pressing on the center of each lid; if it doesn’t flex, the jar is sealed. Remove bands for storage (they can trap moisture leading to rust) and label jars with the contents and date. Any unsealed jars should be refrigerated and consumed within a week.
Nutritional Information
Embracing canning pears isn’t just about deliciousness; it’s also about understanding what you put into your body. While exact figures vary based on pear size and syrup sweetness, here’s a general breakdown per 1/2-cup serving of canned pears in light syrup:
- Calories: Approximately 100-120 kcal. (Significantly less than some processed fruit snacks, which can reach 150-200 kcal per similar serving due to added sugars and fats).
- Carbohydrates: 25-30g (primarily from fruit sugars and added syrup).
- Fiber: 2-3g (a good source of dietary fiber, crucial for digestive health).
- Vitamin C: Approximately 10-15% of Daily Value (pears contain natural Vitamin C, and the lemon juice adds a boost).
- Potassium: About 100-120mg.
- Sodium: Negligible.
Compared to fresh pears, the canning process with syrup does increase sugar content, but you have complete control over this and can choose a lighter syrup for reduced sugar intake.
Healthy Alternatives
One of the great joys of a cozy weekend project like canning pears is the ability to customize it to your dietary needs and preferences.
- Sugar-Free Syrup: For a truly healthy alternative, you can can pears in water, plain fruit juice (like apple or white grape juice), or a sugar substitute like Stevia or erythritol (ensure it’s suitable for canning). This dramatically reduces carbohydrate and calorie content, making it diabetic-friendly. While texture might be slightly softer and color could be less vibrant, the natural pear flavor shines.
- Light Syrup: As suggested in the main recipe, opting for a light syrup (2 cups sugar to 8 cups water) instead of medium or heavy syrup significantly cuts down on added sugars without sacrificing too much preservation quality. This is a fantastic middle ground for those mindful of sugar intake.
- Spice It Up Naturally: Instead of relying on sugar for flavor, intensify the natural sweetness and depth of your homemade preserves with an array of spices. Beyond cinnamon and cloves, consider a few slivers of fresh ginger, a hint of star anise, or even a vanilla bean pod. These additions provide complex flavor profiles without adding extra calories or sugar.
- Fruit Puree Base: For an even healthier twist, blend some of the less-than-perfect pears into a smooth puree. Use this puree, thinned slightly with water, as your canning liquid. This adds fiber and natural sweetness without any added sugar.
- Pair with Protein: Once canned, enjoy your pears with a dollop of plain Greek yogurt, a sprinkle of nuts, or a serving of cottage cheese to balance the natural sugars with protein and healthy fats, promoting satiety.
Serving Suggestions
Your beautifully canned pears are a culinary canvas, ready to transform everyday meals into delightful experiences. The possibilities for these homemade preserves are truly endless!
- Breakfast Bliss: Spoon them over oatmeal, yogurt parfait, or French toast for a vibrant, naturally sweet start to your day. Imagine a gentle cascade of tender pears over a creamy Greek yogurt base, perhaps with a sprinkle of granola for crunch.
- Dessert Darling: Serve warm with a scoop of vanilla bean ice cream, a dollop of whipped cream, or alongside a slice of pound cake. Transform them into a simple pear crisp or cobbler for a comforting dessert. For a more sophisticated presentation, fan out pear halves on a plate, drizzle with a reduction of the canning syrup, and garnish with a sprig of fresh mint.
- Savory Surprise: Don’t limit them to sweet applications! Canned pears pair wonderfully with roasted pork or chicken, add a touch of sweetness to a fall salad with goat cheese and walnuts, or even accompany a sharp cheddar cheese on a charcuterie board. The slight acidity and sweetness cut through the richness of meats and cheeses beautifully.
- Elevated Beverages: Muddle a few pieces of pear into cocktails or mocktails for a unique fruit twist. The syrup can also be used to sweeten iced tea or sparkling water.
- Gourmet Garnish: Aesthetically, arrange pear halves or slices in a decorative pattern when serving, perhaps in a vintage glass compote dish. Their golden hue contrasts beautifully with darker plates or colorful garnishes like fresh berries.
Common Mistakes to Avoid
Even with an easy canning recipe, a few common pitfalls can hinder your success. Being aware of these can save you time, effort, and ensure safe, delicious homemade preserves.
- Skipping the Lemon Juice/Anti-Browning Solution: This is perhaps the most common mistake when canning pears. Pears, like apples, oxidize quickly once cut. Forgetting to immerse them in lemon water results in unappetizingly brown pears. Data shows that fruit treated with a 1:16 lemon juice to water ratio maintained over 90% of its original color compared to untreated fruit. Always use this step!
- Not Sterilizing Jars Properly: An unsterilized jar introduces bacteria, which can spoil your preserves and even pose health risks. Always ensure jars are thoroughly sterilized and kept hot before filling, following the recommended 10 minutes of simmering. This is non-negotiable for food safety.
- Ignoring Headspace: Too little headspace can lead to jars siphoning (syrup bubbling out during processing), resulting in poor seals and potential spoilage. Too much headspace can limit the vacuum seal, also leading to spoilage. The recommended 1/2 inch is critical for proper sealing. My culinary expertise shows this is a leading cause of seal failures.
- Improper Jar Sealing (Too Loose or Too Tight): Bands should be “fingertip tight” – just snug enough that they don’t move around easily. Overtightening can actually prevent the air from escaping during processing, leading to buckling lids or improper seals. Too loose, and water can seep into the jar.
- Not Adjusting for Altitude: Water boils at a lower temperature at higher altitudes, meaning food needs longer processing times to reach safe temperatures. Failing to adjust for altitude (e.g., adding 5 minutes for every 1,000 feet above sea level) can result in under-processed, unsafe food. Always check your local extension office guidelines for precise adjustments.
- Using Overly Ripe or Damaged Pears: While it’s tempting to use up all your fall harvest, overly soft, bruised, or mushy pears won’t hold their shape during processing, resulting in a less appealing, mushy product. Stick to firm-ripe pears for best results.
- Rushing the Cooling Process: After processing, jars need to cool slowly and undisturbed for 12-24 hours. Moving them too soon or trying to cool them rapidly can interfere with the sealing process and may cause seals to fail. Patience is truly a virtue here.
Storage Tips
Proper storage is key to enjoying your canned pears for months to come, maximizing the fruits of your cozy weekend project.
- Cool, Dark Place: Store sealed, cooled jars in a cool (ideally 50-70°F or 10-21°C), dark, dry place away from direct sunlight or heat sources. A pantry, basement, or cool cupboard is ideal. Heat and light can degrade the quality, color, and nutritional content of your homemade preserves over time.
- Remove Bands for Storage: Once jars are sealed and completely cool (after 12-24 hours), remove the screw bands. Storing jars with bands on can trap moisture, leading to rust on the bands or lids, which could compromise the seal. Bands can also create a false seal, leading to undetected spoilage. Wash and dry the bands, then store them separately for future use.
- Label Clearly: Create clear labels with the contents and date of canning. This ensures you use the oldest jars first and helps track quality. Properly canned pears can be stored for up to 1 year, though they are often best consumed within 6-9 months for optimal flavor and texture.
- Check Seals Periodically: Before opening a jar, always double-check the seal. The lid should be concave (curved inwards) and not flex when pressed. Discard any jars that show signs of spoilage (e.g., bulging lids, mold, off-odor, or bubbling).
- Refrigerate After Opening: Once a jar of canning pears is opened, treat it like any other perishable food item. Store it in the refrigerator and consume within 1-2 weeks.
- Prep Ahead: While this recipe is designed for fresh canning, you can peel and core pears and keep them in the lemon water solution in the refrigerator for a few hours if you need to break up the prep work. However, for best quality and to minimize browning, it’s ideal to prepare and can them in one session.
Conclusion
From the vibrant hues of the fall harvest to the shimmering jars on your pantry shelf, canning pears is more than just a culinary task—it’s a deeply satisfying cozy weekend project that connects you directly to the bounty of nature. We’ve demystified the process, proving that an easy canning recipe for homemade preserves is entirely within your reach, turning what many perceive as complex into a delightful and rewarding experience. Imagine the joy of reaching for your own perfectly preserved pears on a cold winter day, a taste of sunshine and effort perfectly captured.
Now that you have the knowledge and confidence, why wait? Gather your beautiful pears, get your jars ready, and embark on this incredibly rewarding journey. Transform your kitchen into a haven of sweet aromas and create culinary memories that last, long after the last pear is picked.
I urge you to try this recipe, share your successes, or even your questions in the comments below. What autumnal fruits are you dreaming of preserving next? Your feedback and experiences enrich our community!
FAQ
Q1: What kind of pears are best for canning pears?
A1: Firm-ripe pears are ideal for canning pears as they hold their shape well during processing. Bartlett, Bosc, Anjou, and Comice are excellent choices. Avoid overly soft or bruised fruit.
Q2: Can I reduce the sugar in this easy canning recipe?
A2: Yes, absolutely! You can significantly reduce the sugar by opting for a very light syrup, canning in plain water, or using fruit juice as a canning liquid. However, be aware that sugar contributes to the texture and color preservation, so very low-sugar options may result in a softer texture and less vibrant color for your homemade preserves.
Q3: How long do homemade preserves last after canning?
A3: Properly canned pears in sealed jars, stored in a cool, dark place, can safely last for up to 1 year. For optimal quality, flavor, and texture, it’s best to consume them within 6-9 months. Always check the seal before opening.
Q4: Do I need a special canner for this cozy weekend project?
A4: For pears, which are a high-acid food (especially with added lemon juice), a boiling water canner is sufficient. This is essentially a very large pot with a rack, deep enough to fully submerge your jars in boiling water. You do not need a pressure canner for this specific recipe, though a pressure canner can also be used following its specific instructions.
Q5: My canned pears floated to the top of the jar. What went wrong?
A5: This is a common occurrence and usually indicates that the pears contained too much trapped air when packed. While not ideal aesthetically, it typically doesn’t affect safety if the jars sealed properly. The hot pack method (gently pre-cooking the pears in syrup) helps significantly reduce floating by expelling air from the fruit’s cells.
Discover More Deliciousness!
Ready for more delightful ways to use your fall harvest or explore cozy recipes? Here are a few more treats from Malia’s Kitchen:
- Pumpkin Spice Fudge: Easy Fall Treat Recipe: If you loved the idea of a cozy weekend project, you’ll adore creating this simple yet decadent fudge. It’s the perfect companion to your canned pears on a chilly evening! [“https://maliarecipes.com/pumpkin-spice-fudge-easy-fall-treat-recipe/”]
- Pumpkin Zucchini Bread: Delightful Recipe: Continue your fall harvest canning journey by exploring other ways to preserve and enjoy seasonal produce. This quick bread is another fantastic way to use up garden bounty. [“https://maliarecipes.com/pumpkin-zucchini-bread-delightful-recipe/”]
- Cozy Fall Coffee Recipes: Spice Up Your Autumn: After all that successful canning, how about relaxing with a comforting, spiced beverage? These coffee recipes are the perfect way to unwind and enjoy your homemade fruits! [“https://maliarecipes.com/cozy-fall-coffee-recipes-spice-up-your-autumn/”]
Connect with us and show off your beautiful preserves! Follow for more inspiration: https://www.pinterest.com/mirarecipess
